

Are your EC2 instances running all the time, even when no one is using them?
This can lead to high and unnecessary costs. By using EC2 Scheduling, you can automatically start and stop your instances based on a set time, helping you save costs without manual effort.
In this blog, you’ll learn how to schedule EC2 instances using simple tools, when and why to use it, and how much you can save by avoiding idle usage.
What is EC2 Instance Scheduling?
EC2 instance scheduling is the process of automatically starting and stopping EC2 instances based on a defined timetable. It helps reduce costs by running instances only when needed, such as during business hours or specific workloads like development or testing.
Why Schedule EC2 Instances?
- Reduce idle-time costs by stopping unused instances
- Ideal for dev/test environments with working-hour needs
- Eliminate human error via automation
- Align compute time with business hours
How to Schedule EC2 Instances on AWS
Since Amazon EC2 does not offer built-in scheduling, you can use two reliable AWS-native methods to automatically start and stop instances based on your defined schedule:
1) Using AWS Instance Scheduler
AWS Instance Scheduler is an official AWS solution that helps you automatically start and stop EC2 instances using pre-defined schedules.
AWS Instance Scheduler Pricing
While AWS Instance Scheduler is a free solution provided by AWS, it uses several AWS services that incur minimal charges.
Here's a breakdown of the typical monthly costs:
Steps to Set UP AWS Instance Scheduler
Step 1: Download the CloudFormation Template
- Visit the official AWS GitHub: AWS Instance Scheduler Template
- Download the CloudFormation template file - instance-scheduler-on-aws.template
Step 2: Launch the CloudFormation Stack
- Go to AWS Console → CloudFormation
- Click Create Stack → With existing resources (template)
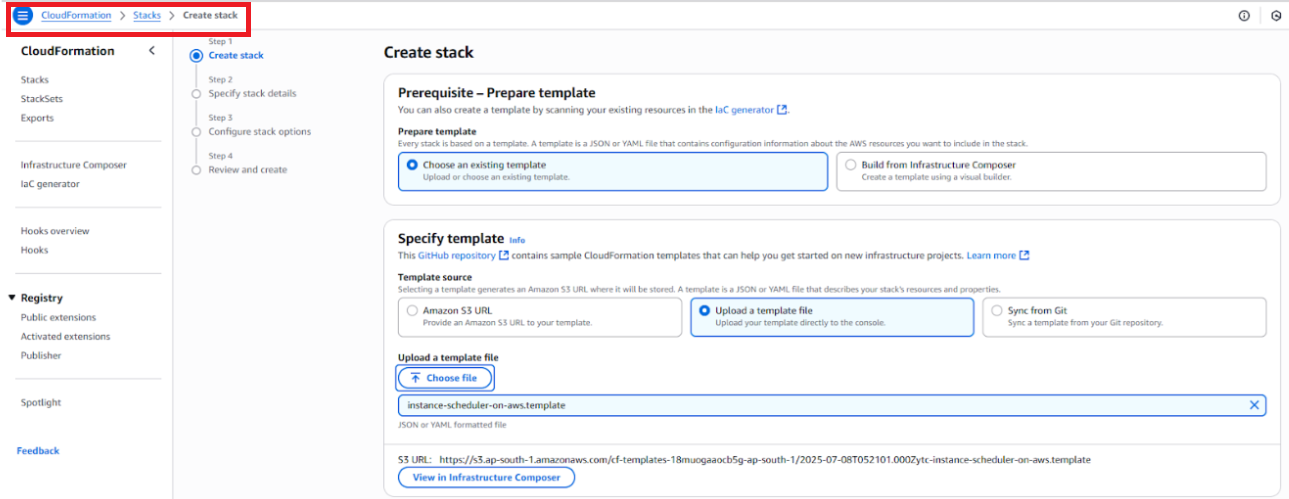
- Choose Upload a template file and upload the .template you downloaded
- Click Next

Step 3: Configure Stack Details
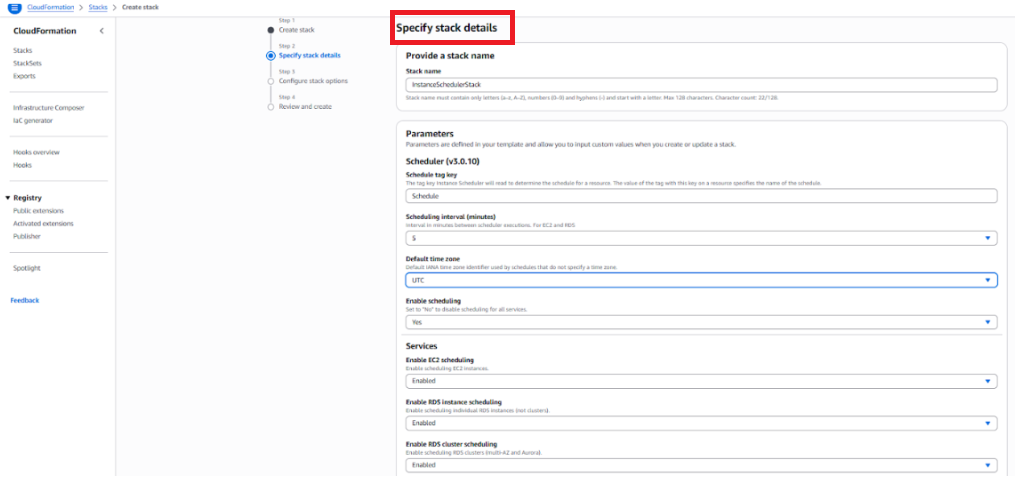
- Stack Name: InstanceSchedulerStack (or any custom name)
- Parameters to set:
Click Next, then Create Stack
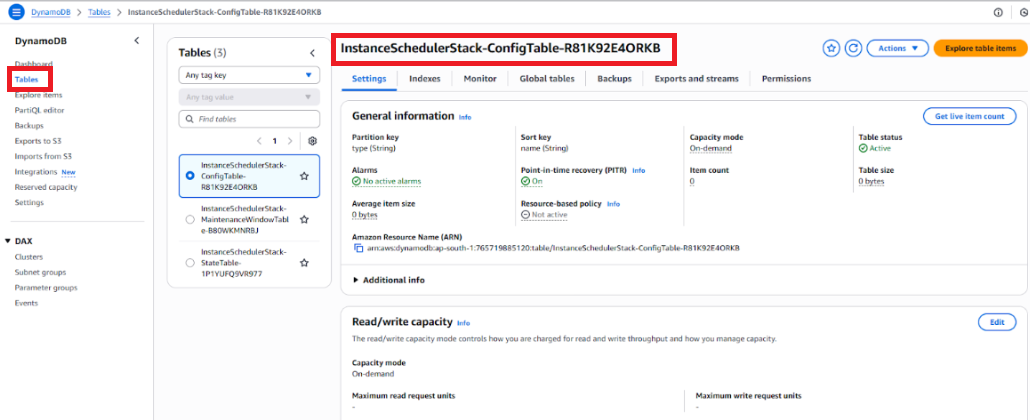
Step 4: Create a Schedule in DynamoDB
- Go to DynamoDB → Find the table named config
- Click Explore table items → Create item
Add two items (one for schedule and one for period):
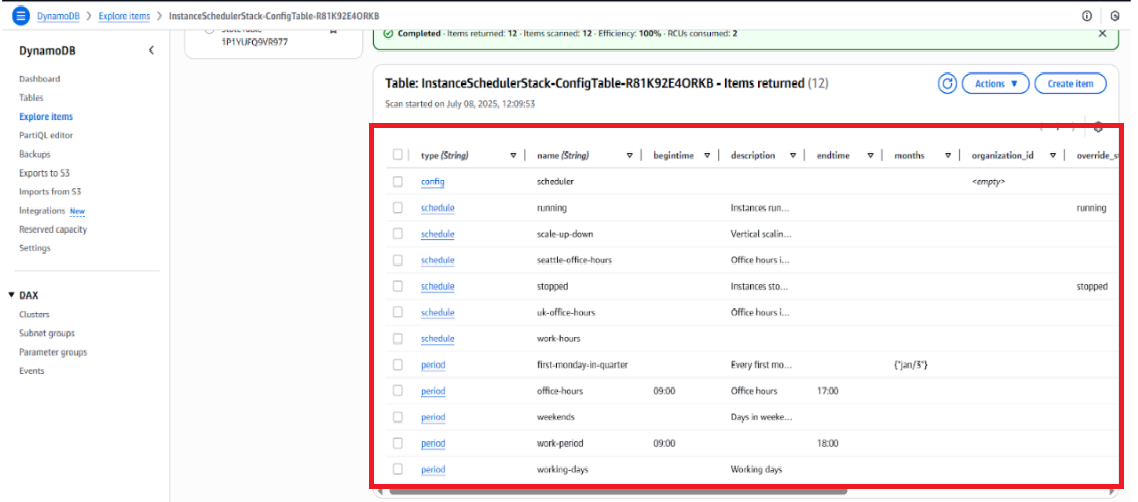
-Schedule Item
{
  "type": { "S": "schedule" },
  "name": { "S": "work-hours" },
  "periods": { "L": [ { "S": "work-period" } ] },
  "timezone": { "S": "Asia/Kolkata" }
}
-Period Item
{
  "type": { "S": "period" },
  "name": { "S": "work-period" },
  "begintime": { "S": "09:00" },
  "endtime": { "S": "18:00" },
  "weekdays": {
    "L": [
      { "S": "mon" },
      { "S": "tue" },
      { "S": "wed" },
      { "S": "thu" },
      { "S": "fri" }
    ]
  }
}
Step 5: Tag Your EC2 Instances
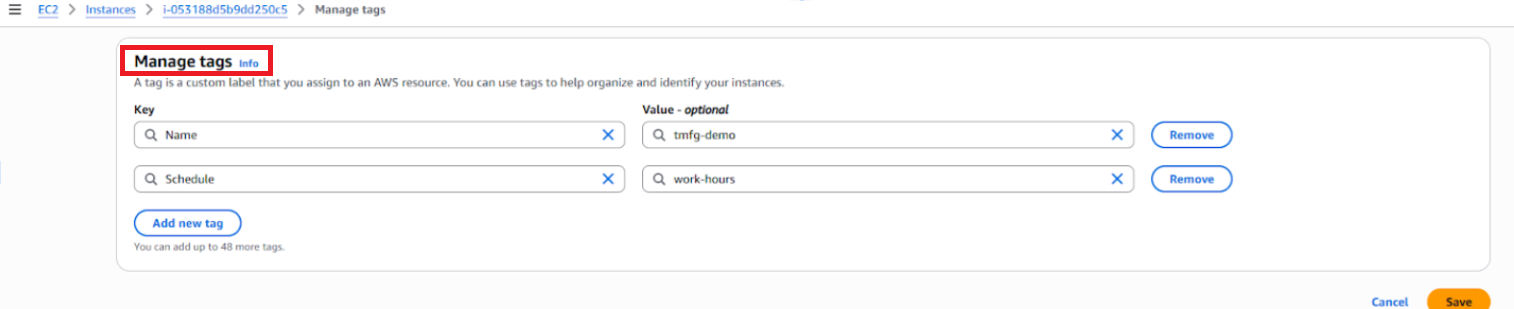
- Go to EC2 Console → Select an instance → Tags → Manage Tags
- Add:
- Key: Schedule
- Value: work-hours
- Click Save
Your EC2 instance is now scheduled to start at 9:00 AM and stop at 6:00 PM, Monday to Friday, automatically—saving you costs during off-hours.
Once you've set up EC2 scheduling, it's important to verify the active time window for each instance.
How to check or confirm the schedule:
DynamoDB 'config' table:
- Go to the DynamoDB table named config.
- Look for items where type = schedule and type = period.
- These items define the active time window (e.g., 09:00–18:00, Mon–Fri).
- You can also create multiple schedules and assign different ones to different EC2 instances via tags.
EC2 Tag ‘Schedule’:
- Go to the EC2 instance → Tags tab.
- Check the value of the Schedule tag (e.g., work-hours).
- Match this value with the schedule name defined in DynamoDB.
CloudWatch Logs (optional but useful):
- View logs of the Lambda functions executing the start/stop actions.
- This confirms whether the instance started/stopped as per the schedule.
2) Using Amazon EventBridge + Lambda
This method is more flexible and lightweight. You define a cron-based rule in EventBridge and use AWS Lambda to start or stop EC2 instances.
Pricing for Amazon EventBridge + Lambda
Automating EC2 instance start/stop using Amazon EventBridge and AWS Lambda is cost-effective and simple. Here's a breakdown of typical monthly costs:
Steps to Set Up Amazon EventBridge + Lambda
Step 1: Create a Lambda Function
- Go to the Lambda console and create a new function.
- Choose Author from scratch.
- Runtime: Python 3.x (or Node.js, if you prefer)
- Paste the following sample code:
import boto3

ec2 = boto3.client('ec2')

def lambda_handler(event, context):
    ec2.start_instances(InstanceIds=['id'])
To stop instances, replace start_instances with stop_instances.
- Add permissions: Attach an IAM role with EC2 access (AmazonEC2FullAccess or scoped permissions).
Step 2: Create an EventBridge Rule
- Go to Amazon EventBridge.
- Create a rule with a schedule:
- Name: StartEC2Morning
- Rule type: Schedule
- Schedule pattern: cron(0 9 ? * MON-FRI *) — This triggers at 9 AM, Mon–Fri
- Set the target to the Lambda function you created.
- To stop instances in the evening, create another rule: cron(0 19 ? * MON-FRI *) — triggers at 7 PM
You now have a custom scheduling setup.
Which One Should You Choose?
References
- AWS Instance Scheduler Documentation
- AWS Instance Scheduler GitHub Repository
- Amazon EC2 Pricing
- AWS Lambda Pricing
- Amazon EventBridge Pricing
Conclusion
Amazon EC2 Scheduling is a powerful yet underused way to cut costs in your AWS environment, especially for dev, test, and staging workloads. Whether you choose the robust AWS Instance Scheduler or the lightweight and flexible EventBridge + Lambda setup, you can reduce idle compute time and realize savings of up to 70% on EC2 charges.


.jpeg)
